
Free Pattern - Luna Crop
Hi Guys,
I've got something a little different for you guys this time!
A friend of mine was wanting me to make her a crochet top, something bohemian and whimsical. Having not ventured down the road of women's top's before, I was hesitant to say the least and was originally going to find a basic crop top online and go with that.
But once a designer, always a designer! It didn't take long for me to realise I really wasn't feeling any of the other top designs out there and it was gonna be best to make something myself from scratch.

First task was to research the best way to make a simple bust cup which was going to be easily adjusted for different sizes. I knew I wanted the cups to be a basic design without any fancy stitches. With a little bit of trial and error I was able to get a design with the right shape and size I was after.
Next part was just playing around with some different stitch variations to get the under-bust panel to have just the right amount of detail, without going over the top. This design came together surprisingly easily over a couple of days and due to the nature of the design, was very easy to grade for various sizes.

This pattern is made with a 10ply/Worsted weight/Number 4 cotton yarn and a 5mm hook. You could also go for a bamboo or bamboo cotton blend - light, breathable and has that stitch definition these tops are known for. I would avoid acrylic yarns and wool for this project. You will find that the cotton does tend to stretch slightly with wear, so don't worry if the top looks a bit small at first as it will stretch out nicely in all the right places once it is worn.

The stitches used in this top are very simple. It really is a quick little pattern to make up (I can make one in a few hours!) and would make a great gift for that teenage daughter or niece who is hard to buy for!
You could also sew bra cup forms (available at most sewing stores) into the inside of the bust for more structure and support.

The full pattern is written out below for FREE, however if you prefer a printable PDF without the Ad's, you can get the download via the below links as usual!
If you enjoy this pattern, please check out my other patterns available.
You can also find other free patterns published here.
Let's Begin!
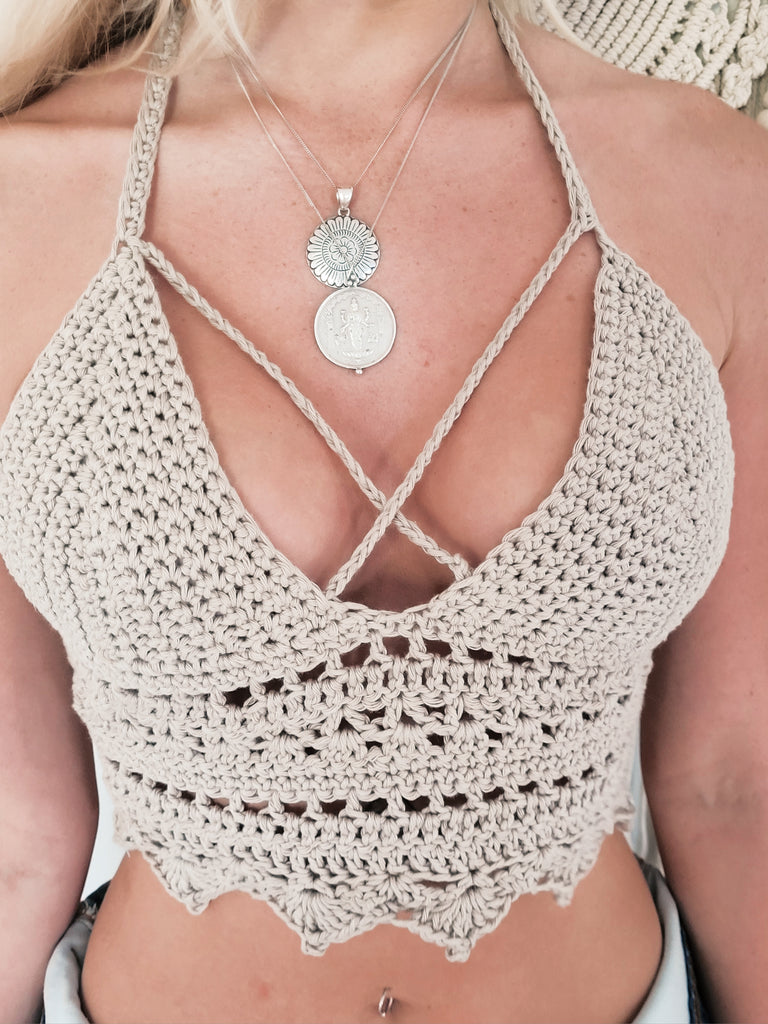
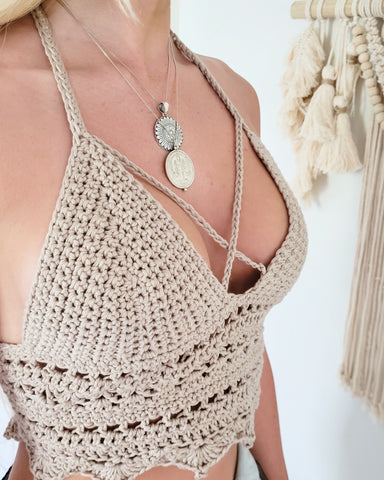
Luna Crop
Sizes:
|
|
Fits Under-bust |
Aus Clothing Size |
US Bra Sizes |
Aus Bra Sizes |
Bra Cup Width |
|
XS (Extra Small) |
67-72cm |
6/8 |
32B and under |
10B and under |
5inch |
|
S (Small) |
73-77cm |
8/10 |
32C/D, 34A/B |
10C/D, 12A/B |
6inch |
|
M (Medium) |
78-82cm |
10/12 |
32DD+, 34C/D, 36A/B |
10DD+ 12C/D, 14A/B |
7inch |
|
L (Large) |
83 -87cm |
12/14 |
34DD+ 36C/D, 38A/B |
12DD+, 14C/D 16A/B |
8inch |
|
XL (Extra Large) |
88-92cm |
14/16 |
36DD+, 38C/D 40D |
14DD+, 16C/D 18D |
9inch |
Gauge;
Sc - 5mm hook
10cm x 10cm = 16 Stitches across and 19 Rows
Materials;
- Yarn; 10Py/Worsted/Aran/Number 4 Cotton Yarn. 100grams
- Hook; 5mm or hook needed to meet gauge
- Yarn Needle
Abbreviations - US Terms;
- Sc - Single Crochet
- Dc - Double Crochet
- SlSt - Slip Stitch
- Ch - Chain
- BLO - Back Loop Only
- Sk - Skip
- St - Stitch
- YO - Yarn Over
Notes;
Top is made first by making the cups and then creating the waistband, attaching the cups as your go. Ties are made last. This pattern includes instructions on how to customise the sizing if your cup and under-bust measurements do not fall under a single size.
Chain stitches at the end of the row are not included in the stitch count. Chain stitches at the beginning of a row will count as a stitch and noted accordingly. A number in front of a stitch – e.g. 2Hdc – means you work 2 Hdc stitches in one stitch. A number following a stitch – e.g. Hdc 2 – means work a Hdc in each of the next 2 stitches. Sequences between asterisks are repeated the number of times shown – e.g. *2Sc, Sc* x5. Sequences in brackets are worked into a single stitch. E.g. (Dc, Sc).
Stitch count is included in brackets after the row instructions. Photos shown are size Small Cup/ Medium waistband. Gauge is important to get your top to fit well. I highly suggest doing a gauge swatch. Top is designed to have negative ease as it will stretch with wear.
All sizes are written together as follows; XS (S, M, L, XL)
The Pattern;
Bra Cups - Make 2
5mm Hook – Sizes: XS(S, M, L, XL)
There is no ‘right’ or ‘wrong’ side for the cups.
Chain 11(11, 12, 13, 14)
Row 1 – Starting in the second Ch from your hook, Sc 9(9, 10, 11, 12), 3Sc in the end Ch, then rotating your work so you are working up the other side of the Ch, Sc 9(9, 10, 11, 12), Ch 1, Turn. [21(21, 23, 25, 29)}

Row 2 – Sc 10(10, 11, 12, 13), 3Sc, Sc 10(10, 11, 12, 13), Ch 1, Turn. [23(23, 25, 27, 29)]
Row 3 – Sc 11(11, 12, 13, 14), 3Sc, Sc 11(11, 12, 13, 14), Ch 1, Turn. [25(25, 27, 29, 31)]
Continue working in pattern: Work an Sc in each St, with 3Sc in the top center St, until you have worked a total of 11(13, 15, 17, 19) rows.
Your cups should measure 5(6, 7, 8, 9) inches across the bottom. If not, just add or remove a few rows. This is also a good time to check if the cups fit comfortably and are the right size for you before continuing. Just keep adding rows until you are happy with the size.

Customising your sizing
If your cup size and under-bust size are different (e.g size small cup size but size medium under-bust size) you can easily customise your top to fit when completing the next section
If you are not customising your sizing, you can skip this section!
When creating the under-bust panel in the next section, the cups are simply centered along a chain which is 73(81, 89, 97, 105)] long + 1 extra chain at the end for turning. You will want to have a 1 Ch gap in between the two cups. By doing a little bit of math, you can work out how to center your cups to the under-bust panel to best fit you.
The Maths;
FYI – Number of Sc stitches along the bottom of each cup size - 22(26, 30, 34, 38)
To work out how many Stitches you need on each end of the panel for the cups to be central use the following equation:
[Under-bust length – (cup width x2) – 1 Ch gap between cups] / 2 = Chain stitches needed either side of the cups.
e.g; Small Cup but Medium Under-bust
[89 – (26 x2) – 1] / 2 = 18
You will need 18 stitches either side of the cups for them to be centered on the under-bust panel! Ta-Da!
Under-bust Panel
5mm Hook – Sizes: XS(S, M, L, XL)
Important Notes - Odd rows will be worked on the ‘wrong side’, even rows on the ‘right side’.
For some of these following rows, the turning chains will count as a St, and for some rows they do not. I have noted accordingly on each row but be sure to read carefully!
Row 1 - Ch 14, Sc 22(26, 30, 34, 38) along the bottom of one of the cups, Ch 1, Sc 22(26, 30, 34, 38) along the bottom of the second cup, Ch 15. (Last Ch counts as a turning Ch only). Row count will remain the same for the remainder of the Under-bust Panel. [73(81, 89, 97, 105)]

Row 2 – Working into the back of the Ch (this just avoids twisting) and starting in the second Ch from your hook, Sc 73(81, 89, 97, 105) all the way along the under-bust panel. Turn.
Row 3 – Ch 3 (Counts as a Dc, Ch 1), Sk 1, Dc, *Ch 1, Sk 1, Dc*, repeat between ** until the end of the row. Turn.

Row 4 – Ch 2 (Counts as 1 Dc), Dc 72(80, 88, 96, 104), Turn.
Important note for the next 2 rows – the last few stitches of row 5 is different for each size to keep the stitch count in line. As a result the first few stitches of row 6 is also different for each size.
Row 5 – Ch 2 (Counts as 1 Dc), Dc into the base of the Ch 2, Sk 2, *(Dc, Ch 1, Dc – this makes a ‘v’ stitch), Sk 2* repeat between ** for remainder of the Row.
Size XS & M – when you have 2 Stitches left in the row; Dc, Ch 1, Dc. Turn.
Size S & XL – when you have 3 stitches left, (Dc,,Ch 1, Dc), Sk 1, Dc in last St.
Size L – when you have 1 Stitch left in the row (this is the Ch 2 from the start of last row); 2Dc, Turn.
Row 6 –
Size XS & M – Ch 2 (Counts as 1 Dc), 2Dc in Ch gap, continue row instructions below -
Size S & XL – Ch 2 (Counts as a Dc), continue row instructions below -
Size L- Ch 2 (Counts as 1 Dc), Dc in next St, continue row instructions below –
Work 3Dc in the Ch gap in the middle of the next ‘V’ St, Continue to work 3Dc in each ‘V’ St from the previous Row. Work a Dc in each of the last 2 St’s of the row, Ch 1, Turn.

Row 7 – Sc 73(81, 89, 97, 105), Ch 1, Turn.
Row 8 – Sc 73(81, 89, 97, 105), Turn.
Row 9 - Ch 3 (Counts as a Dc, Ch 1), Sk 1, Dc, *Ch 1, Sk 1, Dc*, repeat between ** until the end of the row. Turn.
Row 10 – Ch 2 (Counts as 1 Dc), Dc 72(80, 88, 96, 104), Turn.
For Sizes Large and Extra Large (or if you just want a longer under-bust section) repeat Rows 5 to 8 once more before continuing.
Row 11 – Ch 2 (Counts as 1 Dc), Dc into the base of the Ch 2, Sk 3, (2Dc, Ch 3, 2Dc), Sk 3, *(Dc, Ch 1, Dc), Sk 3, (2Dc, Ch 3, 2Dc), Sk 3* repeat between ** for remainder of the Row. 2Dc in last St, Ch 1, Turn.

The final row involves working a picot stitch which is worked as follows– Ch 3, insert hook under the two front bars at the top of the last Dc (see photo), YO, pull up loop, YO, pull through both loops on hook.


Row 12 – Sc in between the first pair of Dc’s, in the Ch 3 gap work (5Dc, Picot, 5Dc), Sc in the Ch gap of the (Dc, Ch 1, Dc), Keep repeating along working (5Dc, Picot, 5Dc) in each Ch 3 gap and work a Sc in the center of each (Dc, Ch 1, Dc). Work a Sc in between the last 2 Dc’s. Tie off.
Optional – You can attach beads or tassels to each picot for added embellishment

Edging and ties.
5mm Hook – Sizes: XS(S, M, L, XL)
Turn work over so the ‘Wrong Side’ is facing you. Join yarn in the top left corner of the under bust panel and Ch 1.

Creating ‘button holes’:
Row 1 - Sc 16(16, 16, 20, 20), along edge, Ch 1, Turn.
Row 2 - Sc 1, Ch 2, Sk 2, Sc 4(4, 4, 6, 6), Ch 2, Sk 2, Sc 4(4, 4, 6, 6), Ch 2, Sk 2, Sc in last St. rotate work 90 degrees to continue working along edge. [16(16, 16, 20, 20)]
Edging:
Ch 2, Sc in same St as the last Sc you worked to turn the corner. Continue to Sc along the top of the under-bust panel and along the outside of the right cup. When you reach the top point of the cup Ch 70.

Starting in the second Ch from your hook, Sc 69 all the way back down the Ch until you get back to the top of the cup. Sc back into the St at the top of the cup, Ch 26(28, 30, 32, 34), SlSt into the BLO of the left cup, approx. 2 St’s from the bottom. Tie off.
Important Note – The Ch you have just created which crosses over the bust should reach across without being too short or long. I work my Ch stitches fairly tightly so you may find you need to reduce the number of stitches needed to reach across.

Join yarn in the BLO of the 2nd St up from the inner edge of the right cup and Ch 26(28, 30, 32, 34), Sc into the top St of the left cup and again Ch 70.
Sc back down the Ch like you did the first tie. Sc into the top of the cup, down the outer edge and along the top of the under-bust panel. (Sc, Ch 2, Sc) in the corner St and Sc another 15(15, 15, 19, 19), down the final edge. Ch 1, Turn.

Create the second set of ‘button holes’:
Sc 1, Ch 2, Sk 2, Sc 4(4, 4, 6, 6), Ch 2, Sk 2, Sc 4(4, 4, 6, 6), Ch 2, Sk 2, Sc 1, SlSt into corner Ch, Tie off and weave in all ends.
Create a separate tie for the back, by creating a Ch approx. 1.5m in length and Sc back along the tie. After tying off and weaving in the ends, use the tie to secure the back of the top by weaving through the ‘button holes’ as pictured below.

Enjoy your new top!


Thank you so much for such a cute pattern. I made it but instead of crocheting the tie for the back I used ribbon and it looks great! Good job with the pattern ,very easy to follow🤙🏼
Kealani Franciosi Rowe on