
Hayden Beanie - Free Pattern
Hi!
It has been a hot minute since I released any new beanie patterns and after a few complex patterns I was happy to get back to my roots and back to the basics. I had a request from a friend of mine to write a pattern up for a ribbed beanie using 8ply yean as she was only finding 10ply or chunky yarn beanies in the style she wanted. So the timing was just right for me to designs and write one up!

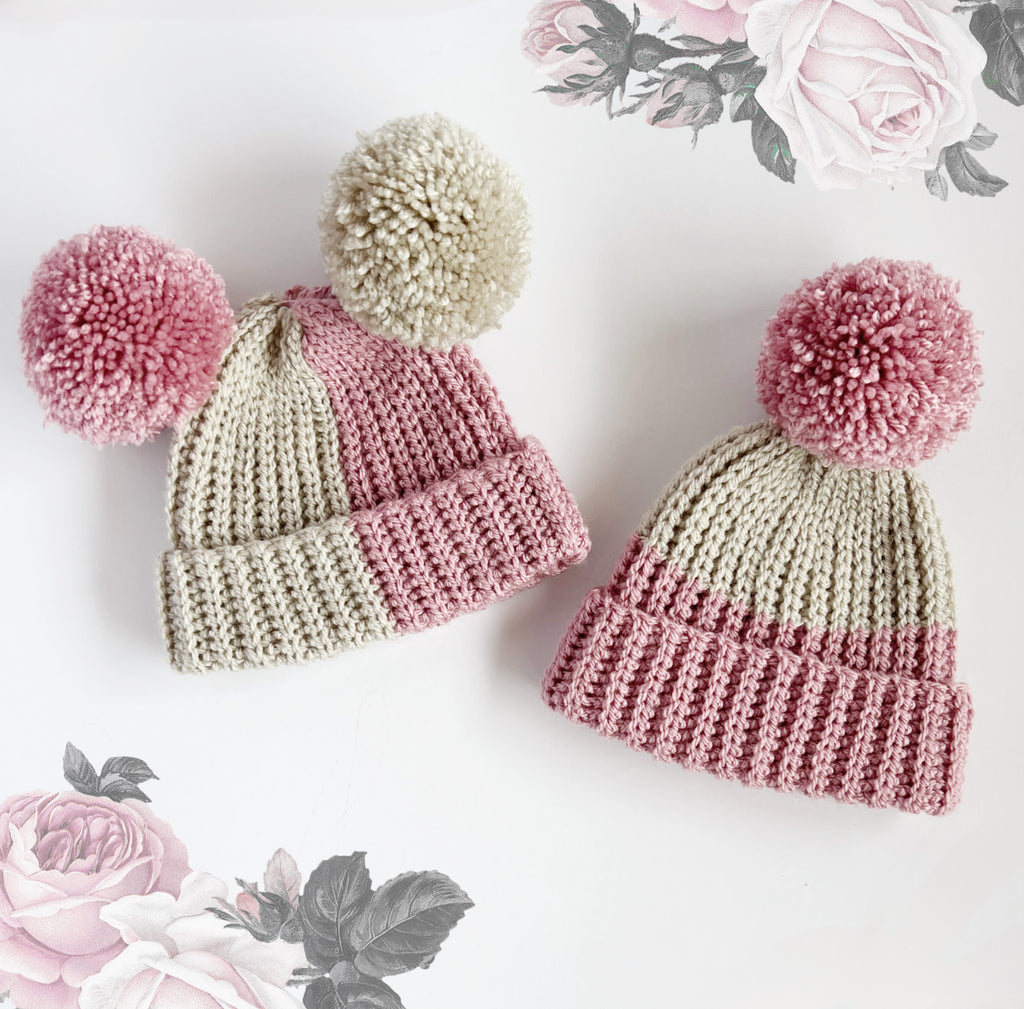
I've been seeing alot of colour block work lately - especially due to the 'Wednesday' trends, so I knew I wanted to incorporate this into my beanie. I couldn't decide if I preferred a horizontal or vertical colour block.. so I figured, why not both?!

I absolutely loved working with the Fisherman Rib Stitch, which you can find in my Zara Sweater and Zara Earwarmer patterns. It is a more time consuming stitch and can take a bit of getting used to, but once you get your fingers into a groove, it starts to work up nicely. It is by far the closest stitch to get a knitted ribbing look.

I initially thought this pattern was gonna to be super easy and straight forward, but the more I worked with it, I soon realized there were little tricks needed to get the colour changes as smooth as possible on both the outside as well as inside the brim. So this pattern is full of great tips and techniques you otherwise may not have thought of.

The full pattern is written out below for FREE, however if you prefer a printable PDF without the Ad's, you can get the download via the below links as usual!
If you enjoy this pattern, please check out my other patterns available.
You can also find other free patterns published here.
Let's Begin!
Hayden Beanie
|
Sizes |
Head Circumference |
Beanie Circumference |
Beanie Height (Brim Folded) |
|
0-3m |
38cm |
32cm |
15cm |
|
3-6m |
41cm |
35cm |
17cm |
|
6-12m |
44cm |
38cm |
19cm |
|
1-3y |
47cm |
41cm |
21cm |
|
3-5y |
49cm |
42cm |
22cm |
|
6-10y |
51cm |
44cm |
23cm |
|
Teen/Small Adult |
54cm |
45cm |
24cm |
|
Large Adult |
57cm |
48cm |
25cm |
Gauge: YO-SlSt-BLO
10cm x 10cm = 19 Stitches across and 18 Rows
Materials:
- Yarn – 8ply DK Weight/Number 3 Acrylic Yarn. I used Stylecraft Special DK in 2 colours. 50grams each colour
- Hook; 4.5mm hook
- Yarn Needle
- Optional – Pom Poms
Abbreviations - US Terms;
- Sc - Single Crochet
- SlSt - Slip Stitch
- Ch - Chain
- BLO - Back Loop Only
- Sk - Skip
- St - Stitch
- YO - Yarn Over
- YO-SlSt - Yarn over Slip Stitch (see notes below)
- YO-SlSt-BLO - Yarn over, Slip Stitch in the Back Loop Only.
Notes;
YO-SlST = Yarn Over, Insert hook, Yarn Over, Pull up loop and pull through the 2 loops on the hook.
Beanie is made in flat vertical rows. The rectangle is then sewn into a tube with one end of the tube gathered shut. Optional Pom Poms are then sewn in place. You can fold the brim back and secure in place with a few stitches. Beanie is designed carefully so the colour changes are completely seamless.
I have provided separate instructions for 2 different colour block options – vertical and horizontal colour changes. The following construction is then the same for both styles


There is no increase or decrease stitches in this beanie. As this beanie is quite simple, all sizes have been written together and I have not included Stitch Counts.
Size 0-3m (3-6m, 6-12m, 1-3Y, 3-5Y, 6-10y, Sm Adult, Lrg Adult)
Beanie Panel
Vertical Colour Change
Size 0-3m (3-6m, 6-12m, 1-3Y, 3-5Y, 6-10y, Sm Adult, Lrg Adult)
Starting with either one of your colours, Ch 40(44, 49, 53, 57, 61, 64, 68)
Important Note
For Row 1, You will want to work into the back of the Ch in order to get a hidden seam when sewing together. Rotate chain towards you and insert hook between the lower loop and center bump.

Row 1 – Starting in the second Ch from your hook, SlSt 6, YO-SlSt 33(37, 42, 46, 50, 54, 57, 61), Ch 1, Turn.
Designer Tip
For the first stitch of Row 2 and the last stitch of Row 3, I suggest inserting your hook through both the BLO as well as the third loop at the back. This will help to stop the bottom edge of the beanie from over stretching. Below photo uses a needle to show where the Third Loop is when shown from the wrong side.

Row 2 –YO-SlSt-BLO 33(37, 42, 46, 50, 54, 57, 61), SlSt-BLO 6, Ch 1, Turn.
Row 3 –SlSt-BLO 6, YO-SlSt-BLO 33(37, 42, 46, 50, 54, 57, 61), Ch 1, Turn.
Repeat Rows 2 & 3 until you have a total of 15(15, 17, 19, 19, 19, 21, 21) Rows in your panel. (You will end on a Row 3)
Colour Change Row – YO-SlSt-BLO 16(16, 16, 20, 22, 22, 26, 30), Change to your second colour, YO-SlSt-BLO 17(21, 26, 26, 28, 32, 31, 31), SlSt-BLO 6, Ch 1, Turn.
Continue to repeat Rows 2 & 3 for a further 27(31, 33, 35, 37, 39, 39, 43) Rows. (You will start and end with a Row 3.)
Colour Change Row – YO-SlSt-BLO 16(16, 16, 20, 22, 22, 26, 30), Change back to your first colour, YO-SlSt-BLO 17(21, 26, 26, 28, 32, 31, 31), SlSt-BLO 6, Ch 1, Turn.
Continue to repeat Rows 2 & 3 for a further 13(15, 17, 17, 17, 19, 19, 21) Rows. (You will start and end with a Row 3.) Tie off and leave a 2-3m tail for construction. Weave all other ends in.
Final Row Count – 57(63, 69, 73, 75, 79, 81, 87)

Design Note
I know you are wondering why I’ve designed the colour changes the way I have. The reason for changing colours mid row and changing colours twice instead of once, is so when the brim is folded back, the colour change will be clean on both sides as shown below. Small details make all the difference!

You can now move down to the Construction Section
Horizontal Colour Change
Size 0-3m (3-6m, 6-12m, 1-3Y, 3-5Y, 6-10y, Sm Adult, Lrg Adult)
Bottom of beanie colour = Colour A
Top of beanie colour = Colour B
Starting with Colour A, Chain 25(27, 30, 32, 36, 38, 40, 44), change to Colour B by pulling through the new colour when working the 26th (28th, 31st, 33rd, 37th, 39th, 41st, 45th) Ch, Chain another 14(16, 18, 20, 20, 22, 23, 23) in Colour B. You should have a total of 40(44, 49, 53, 57, 61, 64, 68) Chains.

Important Note
For Row 1, You will want to work into the back of the Ch in order to get a hidden seam when sewing together. Rotate chain towards you and insert hook between the lower loop and center bump.
Row 1 – Starting in the second Ch from your hook, SlSt 6, YO-SlSt 8(10, 12, 14, 14, 16, 17, 17), Change back to colour A (See instructions for seamless colour changing below), YO-SlSt 25(27, 30, 32, 36, 38, 40, 44), Ch 1, Turn.
Seamless colour changes
When working the last St before you want to change colour;
YO, Insert hook into St, Swing the working yarn under the hook to the front of your work. You can now drop this yarn and it will be ready to be picked up again when you come back in the next row.

YO with the new colour and pull through all 3 loops on the hook.

Continue working along the Row as per the pattern. When you come back in the next row, the yarn will be in the correct position to repeat the process.

Designer Tip
For the first stitch of Row 2 and the last stitch of Row 3, I suggest inserting your hook through both the BLO as well as the third loop at the back. This will help to stop the bottom edge of the beanie from over stretching. Below photo uses a needle to show where the Third Loop is when shown from the wrong side.
Row 2 –YO-SlSt-BLO 25(27, 30, 32, 36, 38, 40, 44), Change to Colour B, YO-SlSt – BLO 8(10, 12, 14, 14, 16, 17, 17), SlSt-BLO 6, Ch 1, Turn.
Row 3 –SlSt-BLO 6, YO-SlSt-BLO 8(10, 12, 14, 14, 16, 17, 17), Change to Colour A, YO-SlSt-BLO 25(27, 30, 32, 36, 38, 40, 44), Ch 1, Turn.
Repeat Rows 2 & 3 until you have a total of 57(63, 69, 73, 75, 79, 81, 87) Rows in your panel. (You will end on a Row 3)
Tie off and leave a 2-3m tail for construction. Weave all other ends in.

Designer Tip
You will find your 2 balls of yarn get twisted around each other so I suggest taking a minute to untwist every few rows.
Construction
Construction is the same for both styles.
Finding the ‘right side’ vs ‘wrong side’
The Panel has a right and wrong side. To get a flawless finish to this beanie you need to make sure you sew the panel with the right sides together
The ‘Right Side’ of the panel will have the starting chain sitting towards the back, almost hidden by the first raised ridge.

Sewing the Panel
Fold the panel in half Right Sides together, lining up the side seams.

With the Starting Ch edge closest to you, Insert hook through the first Ch on the right, and the BLO of the last row worked. SlSt together.

Continue to SlSt the two edges together, going through the Starting chain at the front and BLO of the back.

Tie off but do not cut yarn.
Thread yarn onto a yarn needle. Weave the yarn through the top edge of the beanie (this is the end with the 6 BLO-SlSt). Every second ridge is sufficient.

Pull yarn tightly to gather and close off the top of the beanie. You may find a small hole remains, you can sew the yarn across the gap a few times to help close completely.

Tie off, weave in ends and flip beanie right side out.
Fold brim of the beanie back approximately 5(5, 5, 6, 7, 8, 9, 10)cm. Sew 1 or 2 stitches either side of the brim to help keep in place.
You can attach a Single Pom Pom at the top, or sew 2 pom poms on the sides.
And you are finished!
Enjoy your new beanie and don't forget to tag me if your sharing online, as I would love to see!
